Popcorn ceilings, once a popular design choice, are now considered outdated and can lower the aesthetic appeal of your home. In this guide, we’ll walk you through how to remove popcorn ceiling and transforming your space into a modern haven.
I. Introduction Of How To Remove Popcorn Ceiling
A. Definition of Popcorn Ceiling
Popcorn ceiling, also known as acoustic or cottage cheese ceiling, is a textured finish that was trendy in the mid-20th century. It is characterized by a bumpy appearance resembling popcorn.
B. Reasons for Removing Popcorn Ceiling
While it may have been fashionable in the past, popcorn ceilings are now seen as a relic of outdated design. Removing them not only improves the aesthetics of your home but also allows for a more modern and personalized touch.
II. Preparation
A. Gathering Necessary Materials
Before starting the removal process, it’s crucial to gather all the essential materials, including plastic sheets, safety gear, a ladder, and scraping tools. Having everything ready will make the process smoother.
B. Preparing the Room
Remove furniture from the room, cover the floors and walls with plastic sheets, and ensure proper ventilation. These steps are essential to minimize mess and ensure a safer environment.
III. Safety Measures
A. Importance of Safety Gear
Popcorn ceiling removal can release dust and debris, making safety gear vital. Wear protective clothing, a mask, and safety glasses to minimize exposure.
B. Tips for Minimizing Dust and Debris
Wet the ceiling before scraping to reduce airborne particles. Use a drop cloth to catch debris, and regularly clean tools to maintain efficiency.
IV. Testing for Asbestos
A. Understanding the Risk
A hazardous material. Testing is crucial to assess the risk and determine the appropriate removal method.
B. Hiring Professionals for Testing
For accurate results, it’s advisable to hire professionals for asbestos testing. They can also guide you on the safest removal approach if asbestos is present.
V. Removal Methods
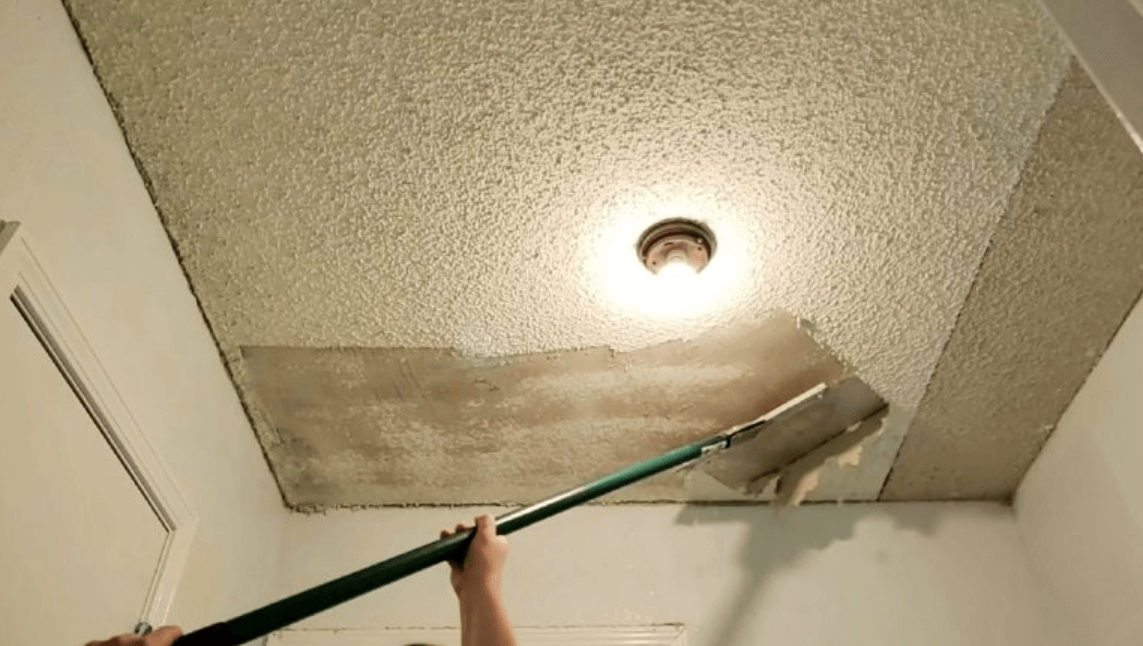
A. Scrape-and-Remove Technique
The most common method involves scraping the texture off the ceiling. This manual approach requires patience and precision.
B. Using a Solution for Easier Removal
Applying a solution to soften the texture before scraping can make the removal process more manageable, especially for larger areas.
VI. DIY vs. Professional Removal
A. Pros and Cons of DIY
DIY removal can save money, but it requires time, effort, and attention to detail.
B. Benefits of Hiring Professionals
Professional removal ensures a faster and more efficient process, reducing the risk of errors. It’s a suitable option for those with limited time or concerns about safety.
VII. Repairing and Patching
A. Fixing Damaged Areas
After removing the popcorn texture, inspect the ceiling for any damage. Patch holes and cracks using a joint compound for a smooth finish.
B. Preparing the Ceiling for a New Finish
Before applying a new finish, ensure the ceiling is clean and smooth. Sanding may be necessary to achieve the desired result.
VIII. Choosing a New Ceiling Finish
A. Options for a Modern Look
Explore various ceiling finishes, such as smooth textures, plank ceilings, or decorative tiles, to give your space a contemporary and stylish appearance.
B. Factors to Consider When Deciding
Consider factors like budget, maintenance, and the overall style of your home when choosing a new ceiling finish.
IX. Step-by-Step Removal Guide
A. Detailed Instructions for Each Step
- Prepare the room and gather materials.
- Test for asbestos if applicable.
- Apply the chosen removal method.
- Scrape off the popcorn texture.
- Repair any damage on the ceiling.
- Prepare the ceiling for a new finish.
- Choose and apply the new ceiling finish.
B. Tips for a Smoother Process
Work systematically, take breaks, and follow safety guidelines to ensure a successful and stress-free removal process.
X. Common Mistakes to Avoid
A. Overlooking Safety Precautions
Skipping safety measures can lead to health hazards. Always prioritize safety by wearing the necessary gear and following recommended procedures.
B. Rushing Through the Removal Process
Patience is key during popcorn ceiling removal. Rushing can result in mistakes, damage to the ceiling, or an uneven finish.
XI. Cost Estimation
A. DIY Cost Breakdown
Calculate the cost of materials and equipment for a DIY project, considering factors like testing for asbestos and purchasing a new ceiling finish.
B. Professional Service Cost Overview
Get quotes from professionals, including testing for asbestos, removal, repairs, and the application of a new ceiling finish.
XII. Environmental Impact
A. Sustainable Disposal Methods
Dispose of removed popcorn texture responsibly, considering recycling options or donating to minimize environmental impact.
B. Choosing Eco-Friendly Materials for Replacement
Opt for eco-friendly ceiling finishes to contribute to sustainability and reduce the environmental footprint of your home improvement project.
XIII. Frequently Asked Questions (FAQs)
A. Can Popcorn Ceiling Be Painted Over?
Yes, but it’s essential to prepare the surface properly before painting to achieve a smooth and long-lasting finish.
B. How Long Does the Removal Process Take?
The duration varies based on the size of the room and the chosen removal method but can typically take a few days.
C. Is Popcorn Ceiling Removal a DIY Project?
It can be, but it requires careful planning, preparation, and attention to safety measures.
D. What Are the Signs of Asbestos in Popcorn Ceiling?
Asbestos is not visible, so professional testing is necessary. However, ceilings installed before 1980 are more likely to contain asbestos. Read more…
E. Are There Tax Incentives for Eco-Friendly Replacements?
Check local regulations and incentives that may offer tax benefits for using eco-friendly materials in home improvement projects.
XIV. Conclusion
A. Recap of Key Points
How to remove popcorn ceiling that is a transformative process that enhances the visual appeal of your home. Whether you choose DIY or professional removal, prioritize safety and take the time to achieve a flawless finish.
B. Encouragement for a Successful Removal Process
Embrace the opportunity to modernize your living space. With careful planning and execution, you can enjoy a new and improved ceiling that reflects your style and personality.